Summit Point Shenandoah Track Guide
Published: December 17, 2013; updated: August 10, 2015
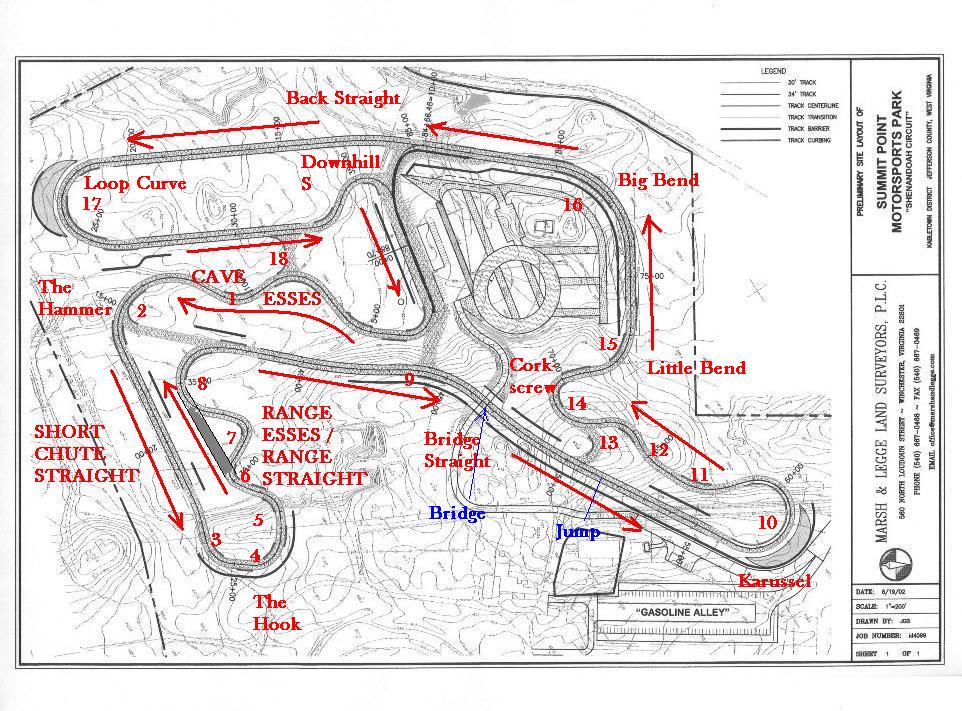
Shenandoah circuit is a long, largely tight and fairly technical road course. It has a wide variety of corners including a Nurburgring Karussel replica and many elevation changes including a "ski jump". The track is busy in the sense that there are several corner complexes with turns one right after another, and the straights are relatively short.
Smaller and lighter cars tend to find Shenandoah more enjoyable than larger and heavier cars. Lower power cars similarly tend to love Shenandoah.
Track map in SVG, another track map.
Turn By Turn
I only ran Shenandoah using the Old Ram bypass of the pit straight.
Pit Straight
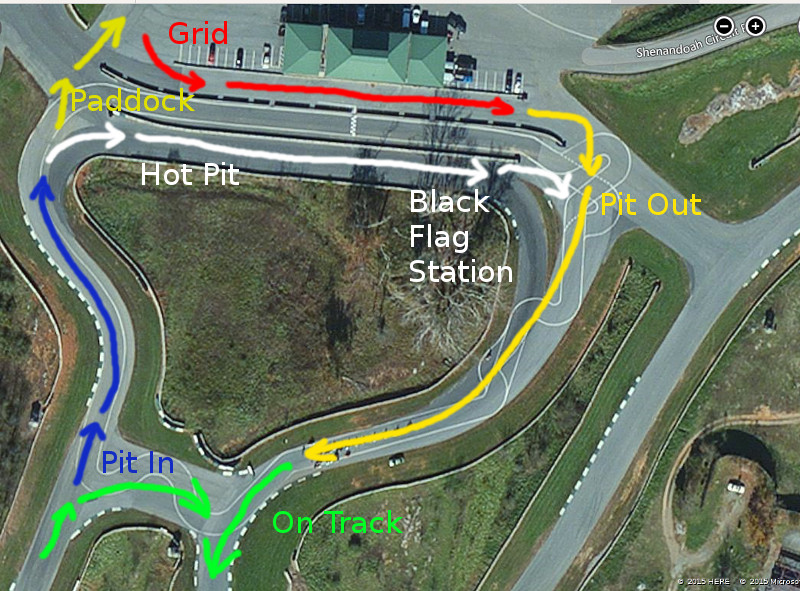
Organizations I ran with used the pit straight as the pit area. The rightmost part of the straight, which can otherwise be part of the track, was the hot pit, with the left area bounded by walls on both sides was the cold pit. Coming out of the pits you make a right and follow the track until you get to what is turn 2 on the map which is the actual track entry with a marshal.
Entry
There is a control person just at the track entry. Wait for the space between cars and get into the Cave Esses.
Old Ram and then turn 4 are taken as a complex; I will get back to them later. On your out lap, maneuver through the Cave Esses (turn 4) and get to The Hammer (turn 5).
Turn 5 - The Hammer
I only ran the course configuration not utilizing the chicane in turn 5. Turn 5 is a slightly late apex corner, and since it is followed by a straight the goal in it is to be on power as early as possible.
At the same time, the track surface has a crown that makes the car drift outward much quicker once it passes track center. You want a late enough apex that you don't lift at track out but not so late that you slip into off-camber part of the track too soon.
Riding the seam between the apex curb and the asphalt can help rotate the car, but requires a high level of grip in the first place in order to work.
As with most corners preceding straights, being slightly late with the turn in is better than being slightly early. Have patience.
If the chicane is coned off, which it typically would be, look for the cones guarding the entrance to get a visual approximation for the track out direction.
Turn 6 - The Hook
The track curves right before turn 6, which is a left turn. In just about anything you should drive straight from the curbing on the entrance of turn 6 on the right side to the apex of turn 6 on the left. Incidentally, if you do this the car will maintain a straight line from the exit of turn 5 deep into turn 6.
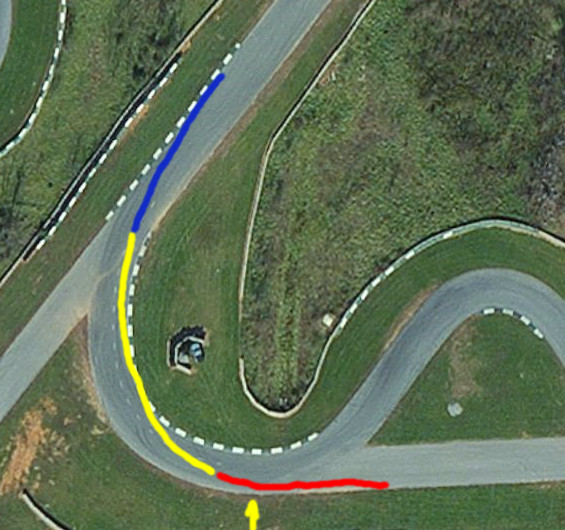
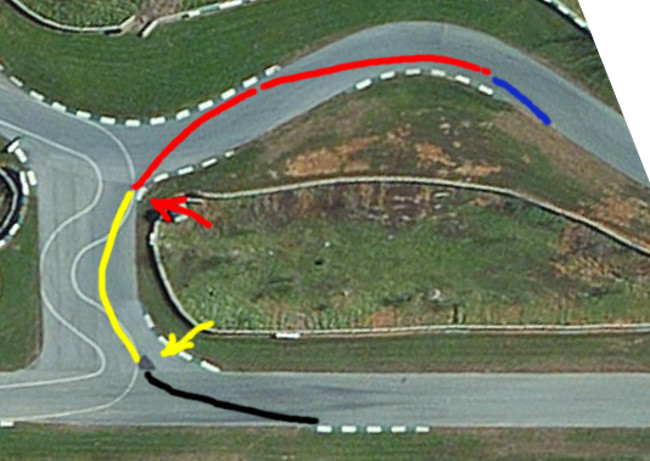
Turn 6 is an entry speed corner - you want to brake as late as possible to maintain the high speed on the preceding straight for as long as possible, as you will not be accelerating between turns 6 and 7. Turn 7, being sharper than turn 6, is also slower than turn 6. Practically speaking this means you should be braking well past the apex of turn 6, still driving in a straight line. Cars with good grip and good suspension can be on the brakes until crossing track center line past the apex of turn 6. Cars with softer suspensions that need time to settle may need to start braking a little sooner, such as where the curb on the right side begins as in the above illustration.
Turn and track out to the outside half of the pavement to set up for turn 7. "Outside half" means the left front tire of the car should roughly follow track center line.
The track is slightly off camber on the outside; be careful with carrying a lot of speed between turns 6 and 7 and aiming to be way outside at the same time. As cars generally do not drive on the right edge of the track there is a lot of debris there which creates a danger of dropping wheels off track when a driver normally tracks out all the way right and comes into this section too fast. Tracking out all the way right is generally not beneficial in terms of lap time.
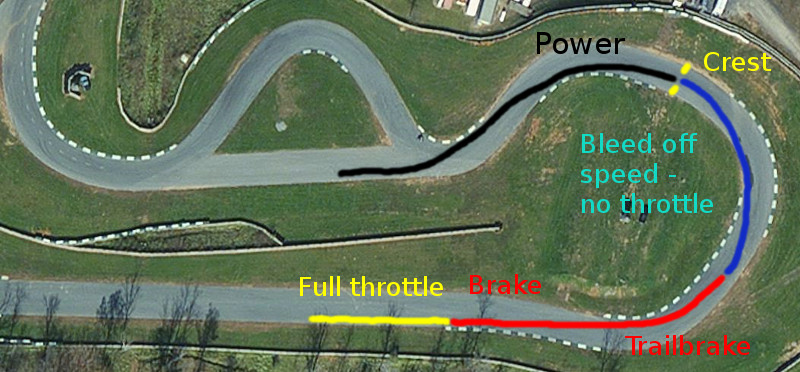
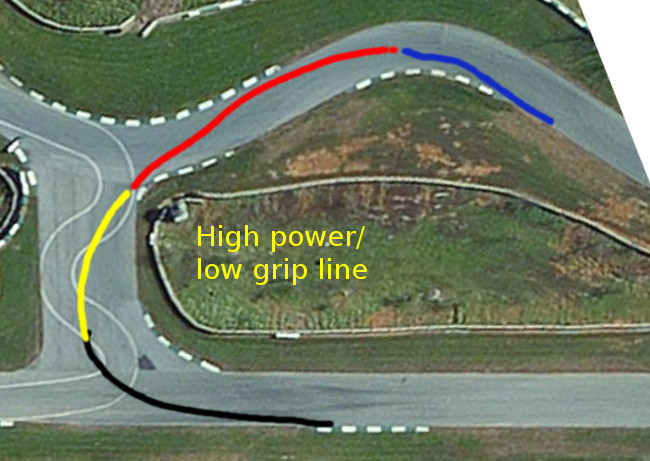
If you are applying throttle on the blue line, your entry speed is too low (yellow/red lines). Come into the corner faster such that the car is decelerating from the moment you hit the brakes all the way until the crest of the hill in turn 7.
Turn 7 - The Hook Continued
The second part of The Hook, this is a blind left hander cresting the hill.
Start by aiming for track center when cresting. If done right, as you get to the bottom of the hill you should be right at the apex of turn 8. You should hold a single arc from the entry into turn 7, or even the exit of turn 6, over the crest and down into turn 8. Cresting track center usually makes this work.
Drivers with more experience can crest slightly left of center, provided you are carrying more speed to make the car drift out back into the line by the time the car arrives at turn 8.
Turn 8 - Range Esses
A tight right turn. It can be somewhat difficult to fit into with a car that has limited grip, is large or heavy.
Most cars should avoid the apex curb as it is fairly steep, and instead drive around it under power, apexing later to make this work. Large cars running for top lap times and street cars with very soft suspensions may cut the apex curb under power. Lifting to go over the curb is generally detrimental to lap time.
Turns 9 and 10
I never ran a configuration utilizing them, but there is an opinion that they are pretty tight.
Turn 11
A fairly tight and tricky right hander.
Leading onto the Bridge Straight, exit speed in this corner is crucial which in turn demands a very precise line through the corner. Precision is made difficult by the off camber nature of most of the turn - similar to The Hammer, once the car is on the off camber part of the track its line is difficult to tighten. A good turn in reference point is the pavement seam running across the track - turn where the seam reaches the left edge of the track:
Trailbrake about 1/3 of the track width past the turn in point, roughly as indicated by the red line. In low to medium power cars start applying throttle around the apex and exit the turn under full power.
High power cars that miss the apex will generally want to run a later apex line through this corner. Low grip cars (i.e., those on street tires) with experienced drivers that miss the apex would want to turn earlier and slide the car into position.
Novice drivers often try to apex turn 11 too early, evidenced by very late power application - some drivers do not start adding power until the car completely tracks out to exit curbing. Intermediate drivers often try to apex turn 11 too late or enter the turn too slowly (which is really the same thing), giving up lap time in the process. A sign of an insufficient entry speed is the car being completely composed during turn in. A proper execution of turn 11 will have the car sliding laterally ever so slightly between turn in and apex, followed by decisive power application around the apex.
The signs on the wall at corner exit can be used to orient oneself as they are visible much earlier than curbing on the pavement.
Early in the morning and when it rains turn 11 gets quite slippery. As the wall is pretty close there, caution is advised.
Turn 12 - Bridge Straight
This turn should be flat out in everything.
When passing or being passed in a high horsepower car, a lift may be needed. Remember to give room to the other car especially when passing.
Bridge Straight Hill
There is a hill on the Bridge Straight just past the bridge. Cars with up to 200 hp or so can crest flat out; more powerful cars may need to lift, depending on how good your suspension is when you land. Crest on the left with the car pointing slightly right - this way the car lands parallel to the plane of the track, minimizing the yaw at landing.
Aiming toward the right side also sets the car up for the correct approach to the Karussel.
Turn 13 - Karussel
Novice drivers should start by dropping into the Karussel parallel to the concrete portion. This is the conservative Karussel entry:
While in the Karussel, aim to keep the left front tire just in the seam between the banking and the flat part of the track on the bottom. Do not try to drive onto the flat part of the track. What you don't want to happen is for the right rear tire to depart the banking on the high side and go airborne, as that will tend to produce an immediate spin.
Experienced and aggressive drivers can drop at an angle, similar to how Nurburgring karussels are taken in this video. If you do this you need to be careful not to drop down too late, as otherwise you will be finding out whether your subframe/oil pan can hold the weight of your car. The angular entry permits carrying a good bit more speed; aim to continue braking while in the Karussel, similarly to the below diagram:
There is a bit of a sharp drop on the bottom of the concrete at the entry which an angle entry avoids. Especially stiffly sprung cars should feel smoother dropping at an angle.
Stiff cars will have the left rear tire airborne when entering the Karussel at sufficiently high speeds. At this point braking in the Karussel may become counterproductive as the rear tires become easy to stop completely, with the result being the car in a drift. I brake completely on asphalt prior to the Karussel and bleed the speed off in the Karussel itself.
Turn 13 - Karussel Exit
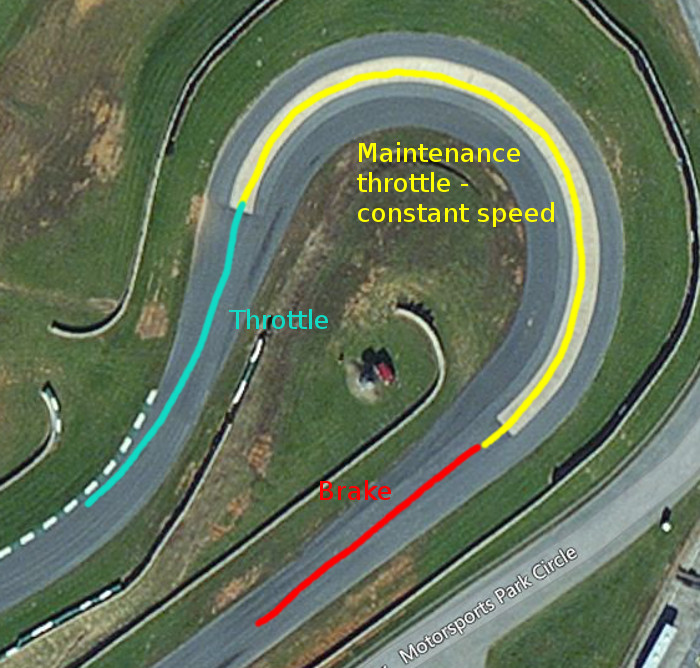
The middle of the karussel is taken with constant steering angle, at a constant speed, because it is effectively a very long constant radius corner.
Karussel exit strategy mirrors its entrance. Less experienced or less aggressive drivers should open the steering wheel toward the end of the Karussel and come out of it parallel to the track (refer to the illustration above).
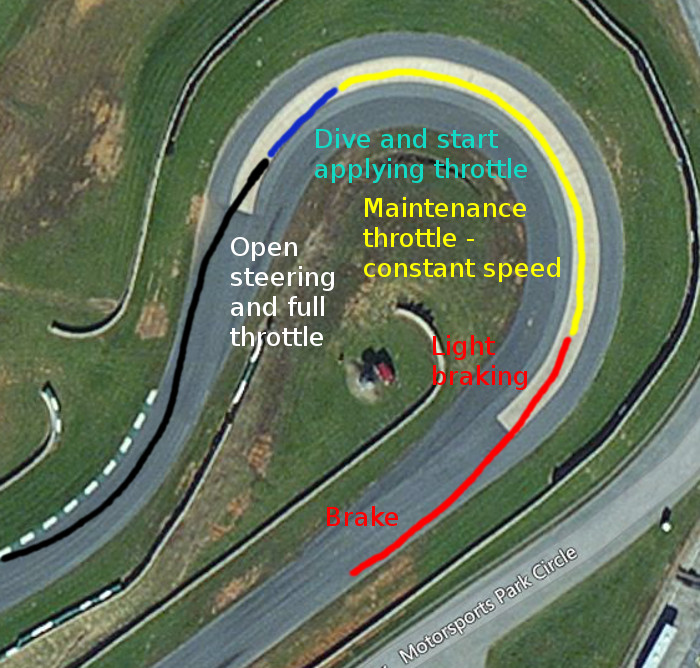
Experienced and aggressive drivers can exit the Karussel at an angle. This requires "diving" toward the bottom edge of the Karussel through maybe the last 20% of it; doing so permits opening the steering much more at the very end of the Karussel, and consequently a much earlier and harder power application. Especially lower power cars can go full throttle over the last, say, two concrete blocks. This exit line can be seen in the Nurburgring video mentioned.
The aggressive line will track out much quicker, and the car will arrive at the right edge of the track typically before the apex of the upcoming right hander. Sufficient tire grip is necessary to make this line work.
Turns 14 and 15 - Karussel Esses
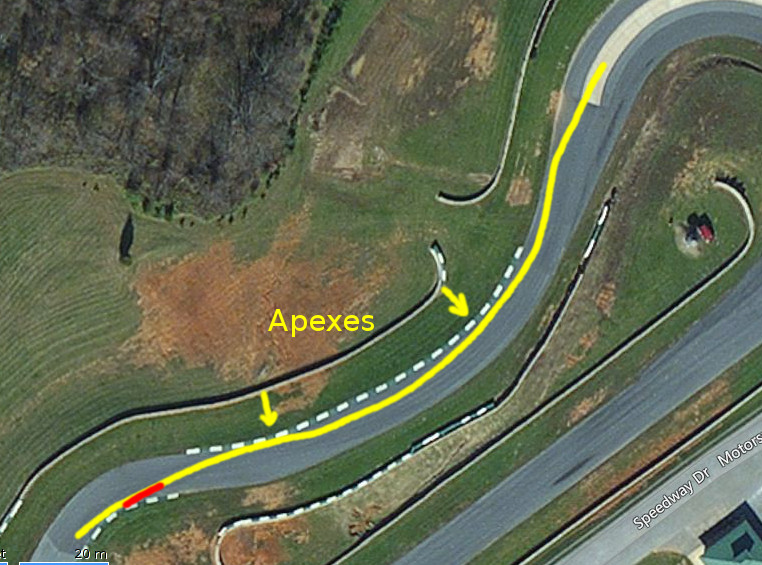
This one turn really, despite being labeled as two turns, typically is defined by your exit out of turn 13 and your entry into turn 16. You will probably be off the apex in turn 14 a little. In a low power car you can accelerate through turn 14 and most of turn 15, and use the part of track between the apex of turn 16 and turn 17 to decelerate for turn 17. Larger and higher power cars might need to set up for turn 16 meaningfully, in which case you will be closer to the apex in turn 15.
A good line for a low power car is the following:
Turn 16 - Karussel Esses Exit
Low power cars run an early apex here, treating turn 16 as an entry speed turn, because turn 17 is much slower. Clip the apex at full speed and hit the brakes just as you are passing it.
Turn 17 - Corkscrew
A very slow right hander. Due to the walls around the track you cannot see the exit until you are committed to the brakes, which results in novice drivers often coming in too hot and performing much harder than usual braking when they realize how sharp the turn really is.
You want to be as far left as possible on the entry, and run a late apex for a reasonable line through turn 18. Go deeper until you feel that you are slow between 17 and 18, then back up a little.
Low power cars may benefit from attacking the exit of turn 17 and the entry of turn 18 aggressively to the point of lightly plowing the front end. The exit of turn 18 is effectively much wider than the portion of the track between turns 17 and 18; therefore, overdriving the car between 17 and 18 produces a higher exit speed out of 18 but the car remains on pavement due to turn 18's wider exit.
Here is a good low to medium power line through the corkscrew:
If you are running the aggressive exit from the karussel, you should be on throttle through the first segment of the yellow line, with the car moving from track right at the apex in turn 14 to roughly track center between turns 14 and 15 to track right again at the apex in turn 15. Straight line the path between turn 15 apex and turn 16 apex as much as possible. I brake lightly toward the apex of turn 16 to kill the body roll of the car to prepare it for the left to right transition that follows, then get back on throttle momentarily (second yellow segment). Brake hard in turn 17 and trailbrake to rotate the car. Immediately get on power at the apex of turn 17 (black line); the car will normally be pushing here, which is fine as long as it does not go too far left. Transition from right to left turn and continue plowing the car through turn 18.
Watch the last lap of this video and observe how much earlier the car tracks out compared to more conventional lines through turn 18. The higher speed in turn 18 is a result of much faster entry in turn 17.
Turn 18 - Corkscrew Continued
This is an exit speed turn, and for that it is important to be pretty far right between turns 17 and 18. Not all cars will be on the right edge of the track between 17 and 18, but you should be right of center in pretty much everything. Be more disciplined in turn 17 if necessary.
In lower power cars turn 18 should be taken under full power with a possible lift at turn in to rotate the car. Higher grip cars may not need to lift.
Turn 19 - Big Bend
Coming onto the back straight, this fast left hander is all about exit speed, sufficiently late apex and commitment to throttle.
Novice drivers typically early apex this turn. All cars should be flat out at the apex, run later apexes until this works. Low power cars like Miatas on good tires can take turn 19 flat out. High power cars might need a brush on the brakes.
Back Straight
There is a small bump in the middle of the back straight that stiffly sprung cars can feel. If it affects you, try to drive over it at approximately track centerline.
Turn 20 - The Loop
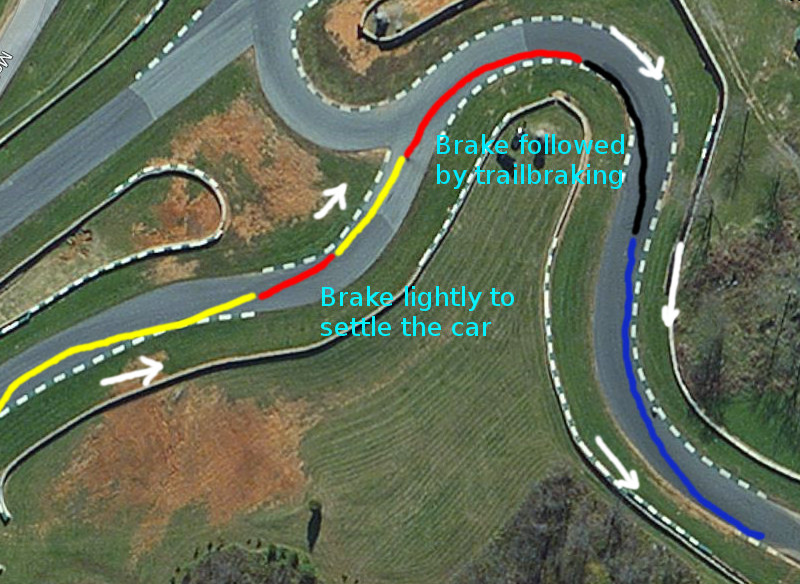
A long left. This can be taken as a double apex, although due to the short straight following it it is often better to run a slightly later apex and essentially throw away the first left's apex. You should need the entire track at the exit. Here is a good low power/high grip line through the loop:
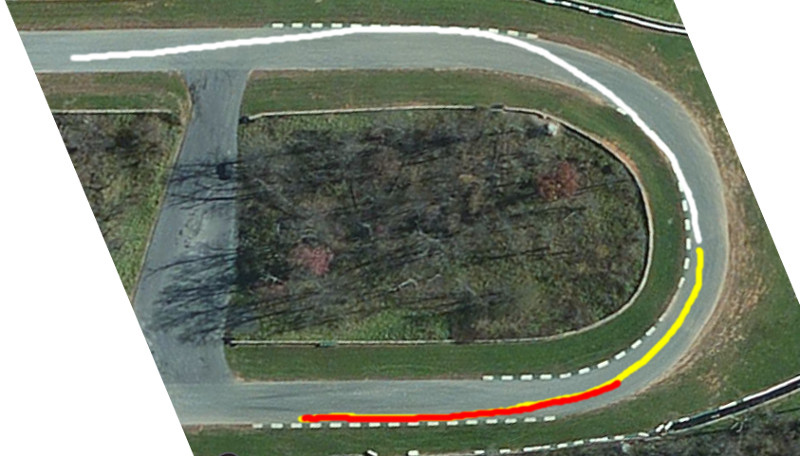
Brake on the red line and trailbrake into the corner. Yellow line can be taken under maintenance throttle, trailbraking or smoothly increasing throttle depending on the aggressiveness of the entry, car grip level and handling. White line should be taken under full throttle.
When it is cold or wet, the loop turn is another spot on the track that is unexpectedly slick, its exit in particular. Be careful.
Old Ram
A partially blind, pretty slow, downhill right. Due to the downhill the exit is invisible from the turn in point, requiring memorization of the turn in point.
There is a wide variety of lines possible in this turn, but regardless of the line chosen the car should touch the second right apex - turn 3 on the map.
Here is a "medium-tight" line that is a good choice for low to medium horsepower cars with medium to high grip:
Trailbrake through the black line, lining up the left front wheel with the outside edge of the dark pavement patch. Continue rotating the car on the yellow line, transitioning to throttle by the second apex.
You should just touch the second apex curb on the right in what is turn 3 on the map. Apply power and continue through cave esses. Generally speaking, the red line in the above diagram should be taken under full throttle.
Cars with more power or which are grip limited will want to run a deeper entry so that they are still applying throttle through the cave esses:
There are some dips in the pavement around the apex curbs that can unsettle the car. These dips seem to be more prominent when the entry into Old Ram is too early, and the car finds itself further toward the right side of the pavement between the first and the second right turns. Going over these dips, or up over the curbs, is generally counterproductive; take a wider line, probably with a later apex especially for the second right hander (which would require a later/deeper entry into the first right hander or coming out more left between the turns), and apply full throttle before the second turn's apex instead for optimal lap times.
Turn 4 - Cave Esses
When using the old ram, turn 4 is a single right turn that follows the tighter right turn 3. Turn 4 is taken as a late apex but under power; typically you should accelerate between turns 3 and 4 and let the car track out of 3 under power until it reaches the turn in point for turn 4. Take turn 4 still under power and lift or brake for turn 5 as necessary.
Car Specific Notes
Start/Finish
Despite the turn numbers beginning around the pits, the timing loop is positioned just before the chicane on the back straight. The timing loop is what WDCR SCCA Club Trials use for the official start/finish point.
Lap Records
There is not much racing going on at Shenandoah circuit, and the races that do happen often use the Karussel bypass which HPDE events do not.
Skid Pad
Shenandoah circuit has a skid pad in the paddock. Usually whichever organization runs on the circuit also has access to the skid pad.
-
Turn By Turn
- Pit Straight
- Entry
- Turn 5 - The Hammer
- Turn 6 - The Hook
- Turn 7 - The Hook Continued
- Turn 8 - Range Esses
- Turns 9 and 10
- Turn 11
- Turn 12 - Bridge Straight
- Bridge Straight Hill
- Turn 13 - Karussel
- Turn 13 - Karussel Exit
- Turns 14 and 15 - Karussel Esses
- Turn 16 - Karussel Esses Exit
- Turn 17 - Corkscrew
- Turn 18 - Corkscrew Continued
- Turn 19 - Big Bend
- Back Straight
- Turn 20 - The Loop
- Old Ram
- Turn 4 - Cave Esses
- Car Specific Notes
- Start/Finish
- Lap Records
- Skid Pad