Pocono IMSA Track Guide
Published: December 5, 2014
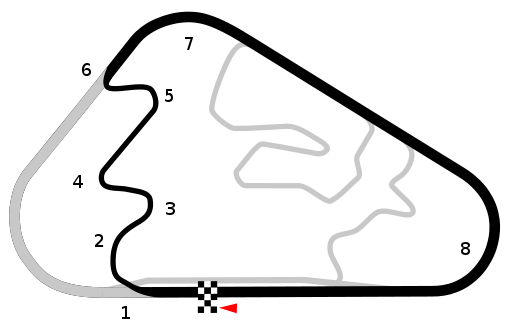
The IMSA course uses the North infield and 3/4 of the trioval running clockwise, which is counter to both the normal North course direction as well as the trioval direction. IMSA configuration starts with perhaps the most exciting and challenging of the signature Pocono oval-into-infield transitions - going from trioval main straight into the North infield. The North infield provides 6 turns of the technical portion of the track, culminating in a sharp 135-degree turn back onto the trioval. Finally the course incorporates over 1.5 miles of the trioval itself through Nascar turns 2 and 1.
Turn By Turn
Turn 1
Coming off the trioval into the North infield, turn 1 is one of the most spectacular corners of any Pocono configuration. Due to the length of preceding straights, most cars carry big speed into the braking zone for turn 1. The track changes direction by 90 degrees but does so over the width of the oval, resulting in a pretty gentle turn overall. At the same time, the infield is much narrower than the oval - some 40% of the oval's width I would estimate - and fitting into the infield width while carrying oval cornering speed is a tricky proposition indeed. Last but not least, there is a big bump right at the transition point which seems to be worst at the ideal driving line.
There are generally three basic approaches to turn 1:
Late apex - brake hard and deep into the braking zone, perform much of the needed rotation while on the outside of the oval, then accelerate through the turn itself. This line can be rather easily shifted later and later over the transition where track surface smoothens out. Unfortunately this line is also slow, typically the slowest of the bunch.
Balanced - much earlier turn in compared to the late apex line. The middle approach dramatically flattens the line through turn 1, permitting much faster speed through the turn which consequently requires a lot less braking than the late apex line does. The flip side of the middle line is that it typically goes squarely through the worst part of the transition. This line is generally the fastest and hardest on equipment.
Tight inside - the goal of this line is to drive around the worst part of the transition on the inside of the corner. The tight line often starts in the center of the track on the trioval main straight rather than being all the way left at the wall. Then, brake early and turn earlier than on the balanced line. Effectively this is an early apex line through turn 1. The challenge with this line is fitting into the track on the exit of turn 1 due to the typically earlier entry. The tight line is not as fast as the balanced line but it may be quicker than the late apex line due to reduced distance traveled, both on the main straight of the trioval if the car never tracks out all the way to the wall and especially on the entry into turn 1 where the late apex line would have the vehicle traveling the width of the oval while moving quite slowly.
Turn 1 exit transitions smoothly into turn 2 entry. Regardless of the line chosen the goal should be to enter turn 1 fast enough that the car cannot accelerate much between turns 1 and 2. At the same time, steering angle should typically not be dialed out much between turns 1 and 2 - these corners should be taken in a single arc at speed.
Turn 2
Turn 2 is a fast right hand sweeper that follows turn 1. It blends into turn 1 exit and the exit of turn 2 must be compromised to set up for upcoming turn 3 - it is important to position the car all the way on the right for turn 3, and the line through turn 2 must accommodate this.
Turn 3
Medium speed left hander. The track is crowned making right side off camber and left side on camber, thus a late entry into turn 3 typically results in the car staying on the off camber part of the track too long and missing the apex by quite a bit. There is not much acceleration happening between turns 2 and 3, therefore the goal in turn 3 is to not overbrake the car as this will cost time on the short straight between turns 3 and 4.
Turn 4
A pretty slow right hander. Turn 4 leads onto the infield straight, thus exit speed is important and entry into turn 4 should generally be conservative to guarantee good exit speed. Many drivers apex turn 4 too early as indicated by a lift on the exit; correctly executed, the driver should get on throttle around the apex of turn 4 and stay on full power until the braking zone for turn 5.
Turn 5
A medium to high speed left hander. It is a long turn which is wider at the entry compared to the exit, thus vision is paramount in taking this turn fast. Similarly to turn 3, turn 5 is crowned and being late with the entry has major effect on car position around the apex. Turn 5 is immediately followed by turn 6 which is the most important corner on the course; when exiting turn 5, keep the steering angle and continue turning left until the car positioned all the way on the left edge of the pavement for turn 6.
Turn 6
A very sharp and quite narrow 135-degree right hander leading onto 1.5+ miles of the trioval, which in lower horsepower cars is effectively a straight. Exit speed in turn 6 has the biggest impact on overall lap time. There is also a bump over the infield into oval transition but this bump is manageable at the low cornering speeds demanded by this turn.
Entry into turn 6 must generally be very conservative to guarantee good exit. The car should be on full throttle at the apex, and even before the apex if at all possible. Brake as early and as hard as necessary to achieve this. Turn 5 exit may need to be compromised to settle the car down for the braking zone of turn 6.
Transition itself is flattest right at the apex. I aim to hang the tires off the inside edge of the pavement at the apex a little. Once this car position is achieved, rotate the car more at turn in until full power can be applied through the transition.
Turn 7
This is the Nascar turn 2. Many cars enter this turn from all the way left at the wall, but lower horsepower cars that are not going very fast can aim for the apex right off the exit of turn 6 and run a diagonal line through the track width, which reduces distance traveled.
Turn 8
This is the Nascar turn 1, taken in reverse. It is a very high speed turn with lots of track width, but it still has a line. Vision is of huge importance in this turn, and drivers who can find their own lines will find this turn a delight.
Lower horsepower cars like Miatas can take this turn flat out, creating an effective straightaway of over 1.5 miles long from the exit of turn 6 to the entry into turn 1.