NJMP Thunderbolt Track Guide
Published: March 20, 2013; updated: April 4, 2017
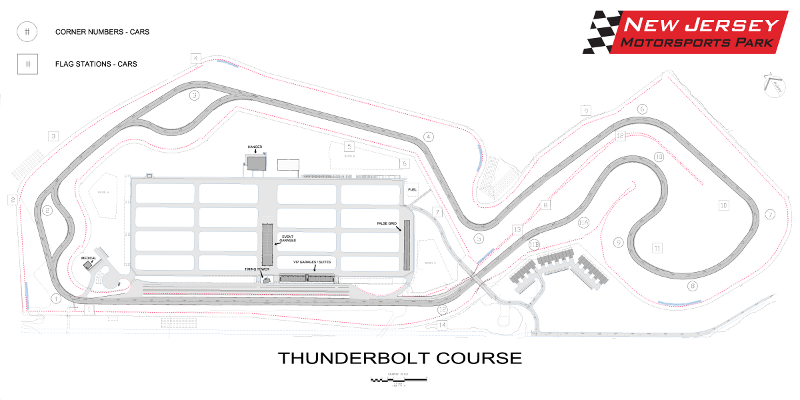
NJMP Thunderbolt is a 2.25 mile road course with 12 official turns.
There are two optional chicanes on the Thunderbolt course, one around turn 2 and another one around turn 3, giving rise to 4 possible track configurations. The most common configuration uses chicane around turn 3 only. The second most common configuration uses neither chicane.
Blend Line
Pit out meets the track just past turn 1. Stay track right all the way through the straight between turns 1 and 2 and through turn 2, then cross over to the left between turns 2 and 3. It is possible for the cars on track and cars coming out of the pits to be in each others' blind spots and/or obscured by the tire wall at pit out.
Turn By Turn
Turn 1
This is a fairly fast right hander.
Many novice drivers try to early apex this turn. Trying to drive up on the apex curb is a good indicator of an early apex.
The apex curb is too steep to make it useful in just about any car. Cars with stiffer suspensions especially will want to avoid going up on the apex curb.
Intermediate drivers should work on carrying more speed through turn 1. If you are on power significantly before the apex and you fit into pavement on the exit, you probably braked too much for this turn.
Use entire track width at corner exit, including exit curbing. If the car ends up at the exit curbing, stay on the curbing until turn in point for turn 2 and turn in from the curbing. The curbing is sufficiently flat that there is no need to try to get off of it.
Turn 2
There is an optional chicane around turn 2, which I have never run.
Turn 2 is a faster right hander compared to turn 1. As with turn 1, novices tend to early apex turn 2.
In low horsepower cars this turn can frequently be taken flat out. Faster cars will need to lift, high horsepower cars will need to brush the brakes. Depending on suspension stiffness and tire grip level staying on pavement may be faster or cutting the apex curb may be faster. If you are cutting the apex curb and lifting to settle the car you likely will be better off staying on pavement and not lifting.
Turning in from the outside curb between turns 1 and 2 and cutting the apex curb substantially flattens the line through turn 2.
Turn 3 With Chicane
With chicane turn 3 becomes three turns which I will call 3a, 3b and 3c.
When running the chicane, the goal is to be on power as early as possible coming out of the chicane and maintain the power until either turn 4. Lower horsepower cars can begin accelerating from the apex of 3b; higher horsepower cars may need to wait until they are set up for 3c.
Turn 3a
This is a fairly slow right because of the required setup for 3c and consecutively 3b. Brake and turn in from extreme left. Turn 3a should be done with a late apex to position the car on extreme right of the track between 3a and 3b to set up for 3b and 3c correctly. Touch the apex curb in 3a.
Turn 3b
This is a left of approximately the same speed as turn 3a. Similarly to turn 3a this is a late apex turn; you want to position the car on the left side of the track at the exit of 3b to set up for turn 3c. Touch the inside curb in 3b as well.
Turn 3c
This is a right hander returning to the main track. If 3a and 3b were correctly executed with late apexes, the car should be accelerating through all of 3c. Lower horsepower cars can be flat out from the apex of 3b forward. Higher horsepower cars may have to wait until midway between turns 3b and 3c to get on power but should not be lifting through 3c. In any case you should be flat out from before the apex of 3c onward.
Apex curbing in 3c is reasonably flat and can be used in just about any car. Cutting the apex curb will substantially straighten the corner, permitting the car to begin accelerating much earlier before 3c while still fitting into track at the exit of 3c.
You can use exit curbing in 3c, but be mindful of it being somewhat rough. Higher powered cars can lose rear tire grip over the exit curb. There is also a pothole right before the curbing begins.
Turn 3 Without Chicane
Without chicane, turn 3 is a very fast right. It should be taken flat out in low to medium horsepower cars. The apex curbing in turn 3 is very usable. There are two levels of the curbing at the apex; the lower half of the curbing is very flat and should be used by most cars to straighten the corner. The remaining half is more elevated and can be used by more aggressive drivers. Try to remain flat out while going over the curbing if you choose to use it, otherwise advantages obtained from straightening the corner are negated.
Turn 3 - 4 Straight And Hill
There is a hill between turns 3 and 4. If running the chicane in turn 3, the hill should be taken flat out in just about everything. If not running the chicane in turn 3, stiffer cars with more horsepower may need to lift while cresting the hill.
Try to crest with the front tires pointed straight, especially in higher horsepower cars if you are passing another car.
Turn 4
This is a still fairly fast right. Novice drivers inevitably overslow for turn 4; taking turn 4 optimally requires a lot of practice and confidence. The track is pretty wide between turns 4 and 5, and this allows carrying good speed through turn 4.
Turn 4 is a tricky one and there is a plethora of lines various drivers are attempting in it:
- Touch the apex curb, track out 2/3 to 3/4 of the track, then keep turning right to go back to the right edge of the track to run a conventional line through turn 5. The driver can momentarily apply throttle between turns 4 and 5.
- Touch the apex curb, track out all the way to the left, keep turning right to go back to the right edge of the track to run a conventional line through turn 5. If this line is used, the car is usually not accelerating between turns 4 and 5; rather, turn 4 is taken faster and that speed is preserved for as long as possible between turns 4 and 5.
- Touch the apex curb, track out all the way to the left, keep turning right to go back to center track. Brake in the center and enter turn 5 from the center rather than from the right. This cuts out the slow entry into turn 5 but also compromises apex speed and exit speed out of turn 5.
Because turn 4 follows by a slow left turn 5, steering is not completely unwound at turn 4 exit. Instead, the turn continues until the car is back on the right side of the track for turn 5 (or center track if entering 5 from there). As a result, when the car hits the left side of the track going through turn 4 steering is typically maintained, and running out of track at turn 4 exit involves dropping wheels into dirt with substantial steering angle - something to be avoided if possible.
It may be worth it to come into turn 4 a little too hot and bleed off speed on the exit side rather than braking before turn 4. This is because turn 4 follows a somewhat long straight but is followed by a very short straight into a very slow turn 5.
Turn 5
This is a slow left, second slowest part of the track. Most cars enter this turn from extreme right. Some enter from the middle of the track (see turn 4 comments above).
Cars with softer suspensions can cut the apex curb if they turn in too early to avoid spending a long time off power. Cars with stiffer suspensions should try to not early apex this turn.
Because the turn is so slow, using full track width at the exit makes a big difference in minimum corner speed and therefore time in this corner. Many drivers, especially at intermediate level and below, do not need to use the entire track at the exit (they can tighten their line and the car will not spin/understeer) and therefore are taking the corner too slowly. The fast line through turn 5 aims to use all of exit pavement. If your right side tires are touching the exit curb and you cannot tighten the line at the exit, you are going fast enough. Use exit curb itself for runoff if you enter too fast.
Turn 6
This is a fast right and it is faster than it initially appears. Low horsepower cars and medium horsepower high grip cars should not need to brake for turn 6, getting away with lifting only. With sufficiently high grip to horsepower ratio this turn can be taken flat out.
It is important to avoid turning in too early as doing so makes it rather easy to run out of pavement on corner exit, especially at higher speeds.
Turn 7
This is a slower right. You are going to need to brake for it, but not a lot. There are two levels of curbing at the apex, with the first level being so flat it is almost an extension of pavement. Use the entire first level of curbing to straighten the corner. Use exit curbing as necessary.
Turn 8
A long right hand sweeper. Most of it is taken flat out after coming out of turn 7. The remaininder is a braking zone for turn 9. Brake in a straight line as much as possible. All cars need hard braking here because turn 9 is very slow.
Turn 9
The first turn of "the octopus". This is a slow right, the slowest corner on the track. It is easy for intermediate and advanced drivers new to the track to overestimate the speed at which turn 9 can be taken and go off track trying to either brake or turn into it, especially in the first session of the day on cold tires.
The more standard line through turn 9 involves starting on the right edge of the track, braking in a straight line toward the middle of the track, then turning hard and positioning the car back on the right side to set up for turn 10.
An alternative line uses the seam between pavement and inside curbing through turn 9. If done with correct line, the seam rotates the car into the turn at a higher speed than what is possible on the standard line. Taking the seam line involves altering the braking zone to be more tangential to turn 9's apex, essentially beginning to brake from 1/4-1/3 off track right and getting to all the way track right while still braking, finishing braking with trailbraking while turning over the seam.
Turn 10
This is a somewhat faster than turn 9 left and the second turn of the octopus. It is probably the most difficult corner of the track. Usually drivers start by holding a mid-track line through turn 10 or hugging the inside edge of the track. A faster line is to start the turn much wider, by delaying the turn in from turn 9, which effectively executes a late apex through turn 10. The late apex straightens the exit of turn 10 allowing you to get on power way before turn 10's apex. Pulling this off requires a car that is either neutral or understeering at low speeds. The more oversteer the car has, the more finesse is required from the driver to keep it from going sideways under power because engine RPMs tend to be quite high there.
Cars with strong understeer at low speeds but a lot of power can benefit from a very late apex. Basically, brake the car in a straight line between turns 9 and 10, do most of the turning at the turn in point for 10, then power out through 10-11a-11b.
Alternative line thorough turn 10 is similar in concept to the alternative line through turn 9. It takes advantage of the seam between pavement and apex curbing. There is a very specific spot that should be used for entering the seam; 1 foot too early will result in the car running out of track on the inside, requiring a lift, while 1 foot too late will keep the car on pavement where the "seam effect" will not be experienced. If the seam is entered just right, the seam will rotate the car into the turn allowing for significantly higher mid-corner speed and since the seam is on the left side of the track it will also position the car much better for acceleration through the following turns 11a and 11b.
Turn 11a
This is the first half of the "snake" combination. Move left to right as you come out of turn 10 toward turn 11a. Touch the apex on the right going through turn 11a, using the apex curbing if necessary to maintain flat out acceleration.
Depending on your power level, gearing and grip level it may be worth upshifting to the next gear in 11a or 11b if you cannot put the power down in the lower gear.
Turn 11b
The second half of the "snake" combination. Transition right to left and touch or use apex curbing as necessary.
Turn 12
This is a fast right. Low to medium horsepower cars should take turn 12 flat out. High horsepower cars may be able to take turn 12 flat out if they have enough tire, otherwise a lift should suffice. There are 3 levels of apex curbing, use all of the first level to straighten the turn. Despite significant speed you should be unwinding steering at track out, therefore dropping wheels at track out in turn 12 is typically a recoverable condition for more experienced drivers.
HPDE Passing Zones
In novice groups most of the passing will happen on main straight, between turns 1 and 2, 3 and 4 if not using the turn 3 chicane and between turns 5 and 6.
Intermediate groups add the straights between turns 2 and 3, 3 and 4 if using the chicane, 4 and 5 and between turns 6 and 7.
There is typically no passing in the octopus or the snake following it in anything lower than advanced run groups.
Other Resources
Videos
Without Chicane
Yours truly in a Miata, 1:39 (full curb usage, low power, high grip line through Octopus):
Porsche 997 GT3RS, 1:26 (quality is not great unfortunately, driver can use more of the track and use the curbs better):
Porsche GT4, 1:30 (driver can use more of the track and use the curbs better, and will benefit from left foot braking):
Lotus Exige (better usage of the track compared to either of the Porsche videos and higher commitment to throttle, high power and high grip lines through Octopus):
Corvette C5 Z06 (excellent throttle utilization, "guest driver" line through Octopus, the driver will benefit from left foot braking):