Barber Motorsports Park Track Guide
Published: February 21, 2017
Barber Motorsports Park immediately became one of my favorite tracks. It has a good mix of tight and open turns, massive elevation changes, plenty of width and good spacing between corners. The track is busy but in a challenging, positive way.
The track is 2.48 miles long with 17 official corners. It feels longer than 2.48 miles, I would say it drives like VIR Full at 3.2 miles. This is probably because there is a multitude of corners packed into the lap, but even so there are enough straights to not make the lap feel rushed, although Barber certainly does not have the spacing between elements of, say, Watkins Glen.
The track rewards mechanical as well as aero grip, well balanced cars, and a limited slip differential comes in very handy.
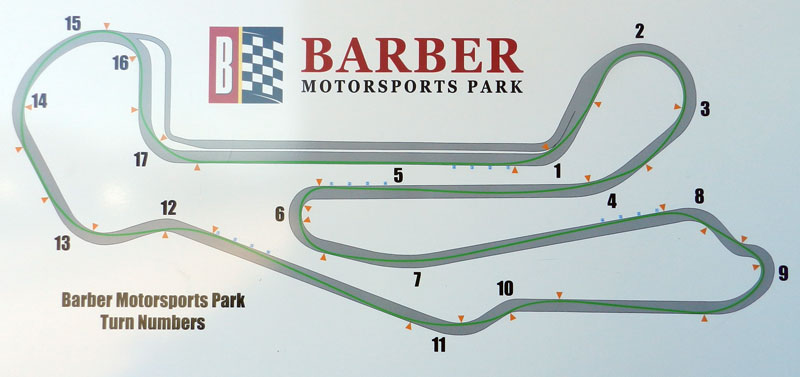
Turn By Turn
While Barber has plenty of variety, there are some general principles that are helpful to keep in mind as you are going through the lap:
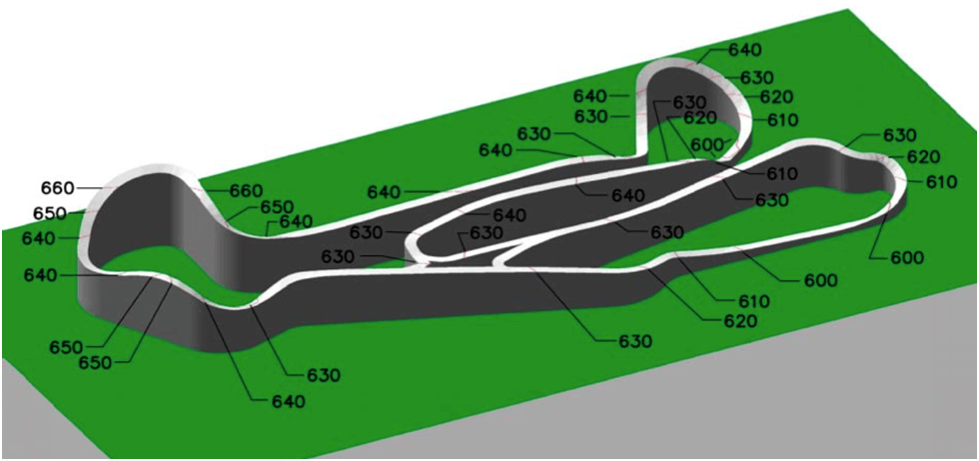
Going uphill reduces speed gain and shortens braking zones. It also allows opening the wheel earlier and tracking out more aggressively (turns 2, 6, 15).
Going downhill can overload front tires which is difficult to recover from, hence downhill braking zones call for smoother brake application, less peak brake torque and spreading the braking zone over a longer distance (turns 6 and 9).
Banking in the corners helps rotate the car, hence allowing for higher corner entry speed. The better rotation often results in the drivers facing the apex curb if they turn in too soon; the correct action is almost always to take the apex curb rather than turn away from the corner. While banked corners are generally easier to drive than flat ones they still demand precision lest the car lose speed by being airborne over the mentioned apex curbs (turns 1, 2, 13).
Vision and confidence play a big part in being fast through the blind corners, including apexes and corner exits over the crests (turns 2, 4, 9, 11, 13, 14).
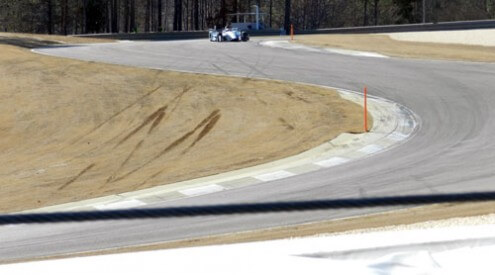
Turn 1
This is a very fast left, a much faster turn than most DE drivers grant it. Looking at the elevation map explains what is going on in this turn:
- A downhill banked entry helps with turn in but makes apex overruns a likely event, and the apex curb is too steep to use it;
- The same downhill banked entry means braking should be conservatively completed, because missing the turn in point results in the car being way off the apex and with strong probability of running out of track at the exit;
- The exit is uphill, thus carrying momentum into and through the turn in a low power car is crucial;
- The uphill exit means the car should be on throttle past the apex of turn 1;
- Finally, the line transitions mid track past the exit to set up for turn 2.
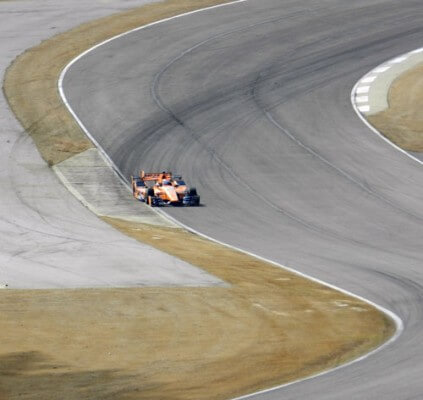
The aggressive track out is visible in the rubber traces in the above photo. The darker lines are probably from high downforce cars on soft tires and from cars that overshot the turn and thus are scrubbing more.
Precision is key in turn 1 - as mentioned you do not want to run over the apex curb but the car can easily do this. Vision and discipline here yield consistency and speed.
I found that adjusting the braking point is the easiest way of adjusting the turn in point for turn 1. If I want to turn in later, I brake later; if I want to turn in earlier, I brake earlier. I still pay more attention to the actual turn in point in turn 1 than in turns 6 or 8.
Turns 2-3
To me as a Northeasterner turn 2 is reminiscient of the Lightbulb at NJMP Lightning, and drives very similarly. The Barber turn has more elevation gain going in, more elevation loss going out, but even though it could have more banking compared to sea level, both approach and exit are on the same slope of the hill, making the middle of turn 2 drive like an off camber corner.

There are two principal lines through turn 2: the "hugger" line and the "angle" line.
The "hugger" line follows the inside edge of the track through most of the turn. This is an easier line to drive, and it is still respectably quick. Apply full throttle somewhere around the apex and start tracking out to the exit curb on the left.
The "angle" line requires more grip and a car which is capable of both rotating on demand and staying planted. Come out 1/4 of the way toward track left between turns 1 and 2, the angle the line into turn 2 trying to make a straight line. This approach calls for a later braking point compared to the "hugger" line. Rotate the car with trailbraking at the end of the braking zone, rapidly changing direction toward the track out point, and immediately go to full power. If you have a car that can pull this line off, the reward is later braking as well as earlier throttle application, saving maybe half a second in this turn. A car with insufficient grip likely will not rotate enough to make the angle line work or will be unable to plant the rear once power is applied, resulting in an extended slide under power. Both cost time and make the angle line as slow as the hugger line.
Low power, high grip cars should be full throttle before the exit curb on the left is visible. Medium power cars and medium grip cars may be at part throttle for some time in the middle of the turn. High power cars will probably run a very pronounced version of the angle line with a deeper entry.
Regardless of car position and heading at the apex, use the entire track on the downhill up to and including the rumble strips in the left exit curb. The track gains camber again around the exit of turn 2 which is also the area labeled "turn 3" on the map, helping the car stay on pavement under power here.
Turn 4
Continue the arc from the point of throttle application in turn 2 through the exit curb on the left and it will end up roughly at the apex of turn 4. Low power cars can just about make a straight line from the exit curb in turn 2 to the apex of turn 4 just past the crest; higher power cars will have more of a bend in between. Regardless of the vehicle the car should crest just a bit off the right edge of the track and then be adjacent to the apex in turn 4 shortly after the crest. Past the apex, low power cars will be able to almost hug the left edge of the track while high power cars will need the entire track width as they will be traveling very quickly indeed.
Turn 6
This is a downhill-off-camber-uphill left. The off-camber nature of the turn is subtle to pick up visually while in the car because the entire turn is on a slope, similarly to turn 2. Turn 6 drives fully like an off-camber turn though: grip at the turn in point and mid corner is limited, resulting in most cars staying in a higher gear through turn 4. I tried second gear in a Miata and it produced nothing but wheelspin. A limited slip differential should make a big difference in this corner.
The braking zone has surprisingly abundant grip considering it is downhill, permitting rather heavy brake application. Because the braking zone follows a crest and is downhill it takes time for the weight in the car to stabilize and allow for maximum deceleration. Initial brake application should be smooth and ramp up over maybe a second; the middle of the braking zone is then devoted to hard braking, with the car transitioning to trailbraking at the end of the braking zone.
Because the turn in is off camber, trailbraking is critical in rotating the car into the turn. This requires properly timing the initial brake application - braking too early and coming off the brakes too early as a result moves the weight rearward in the car, producing understeer at the turn in point. Brake release should be smooth and fairly long, overlapping with turn in. Most of the direction change in turn 6 should happen at the turn in point.
Low power cars will have a fairly early turn in point because they will not be gaining much or any speed through the corner once on throttle. High power cars will have a deeper turn in point and will be doing even more rotation at turn in. In this sense turn 6 is similar to VIR turn 1.
Throttle should be applied in the first third of the corner, and if the car has been sufficiently rotated at turn in it should come out of turn 7 without the driver lifting. As mentioned, many cars will opt to take turn 6 in a higher gear, with exceptions being cars with limited slip differentials, soft tires and aero. Use the entire track at the exit including the exit curb which is about 1/3 of a car width.
Turn 8
A fast right, this turn calls for light braking to stabilize the car between turns 8 and 9 if not to bleed some speed off. High grip cars can almost brake in the turn itself rather than prior to the turn.
Exit of turn 8 is an arc made from the left curb in turn 9 back to the apex of turn 8. Depending on the car a squirt on the throttle can be possible between turns 8 and 9.
Turn 9
A left-right chicane, this turn can be awesome if taken properly and I imagine would be quite miserable otherwise.
The correct line through turn 9 is to run the entire left curb over with the ieft side tires. Aim to have the left edge of the tires be at the left edge of the curb. The entry line into turn 9 dictates the exit line out of turn 8.
Braking for turn 9 starts sometime before the left curb and ends just before the right (apex) curb. Depending on the car the braking point can be half way between turn 8 apex and the left curb prior to turn 9, or just before said left turn. As the car is going to unload over the left curb, and turn 9 entry itself is downhil, the braking must necessarily be light. It should also be conservative as blowing the entry in turn 9 will ruin the lap time as the straight between turns 9 and 10 is long enough.
As with turn 6, trailbraking is required to get the car rotated into the turn and initial braking application needs to be timed appropriately. Riding the seam between the apex curb in turn 9 and the pavement also helps rotate the car. Taking more of the apex curb is generally counterproductive.
Turn 9 exit is still downhill, but banked. Low power cars can track out aggressively as they are able to continue rotating under full throttle through the last third of the turn. High power cars will go a bit deeper into turn 9 for a later apex and will need to get more rotation done at turn in point, as they will surely drive off track at the exit otherwise.
Turn 10-11
This uphill chicane is taken flat out in low power cars. Medium power cars should still take it flat out and use the exit curb on the left side between turns 7 and 8. High power cars will be brushing the brakes here.
The entry into turn 10 is banked somewhat as well as uphill, and this banking disappears by turn 11 apex, with turn 11 exit being flat. The result is it is quite easy to rotate the car around turn 10 entry but is it rather difficult to change direction past turn 11 apex. Low power cars can enter turn 10 roughly track middle and still fit into the turn 11 exit; for medium and high power cars precision in this section becomes more and more important. In higher power machinery turn 10 becomes a late apex turn to get a good angle going into turn 11.
Turn 12-13
The second chicane on the back side of the track is more complicated. Even in my Miata I had to apply a bit of brake to settle the car going into the left turn, although a PTE Miata with a wing seemed to take this section without braking. Downforce and mechanical grip are likely to have the most dramatic effect in this part of the track.
The critical part is positioning the car in the right place at the right side apex curb. I was going for about 2/3-3/4 way through that curb as my apex. Neither early nor late entries are good; an early entry requires cutting much of the apex curb to stay on track which upsets the car as the curb is very steep, resulting in the car understeering or oversteering when the right side tires finally land. A late entry (at the normal entry speed) results in rapidly running out of track past the apex as the car is cresting the hill, likely followed by an off-track excursion between turns 13 and 14. Like in turn 1, an early entry and cutting the curb is safer than a late/missed entry because there is time to lift, bleed some speed off and adjust the car's trajectory.
There is banking in both turns 12 and 13 but as the turns are facing different directions, the banking is correspondingly opposite which means there is a transition in the middle. Getting the car into the inside half of track width helps the car turn in both corners.
Turn 14
This is largely a confidence turn, although getting the car to hold its line at the exit under throttle can be a challenge in lower grip cars. Low power and high grip cars can maintain full power throughout turn 14, using the entire apex curb. With less grip or more power the car is likely to understeer at the exit, compromising turn 15 entry; the correct adjustment is to turn in for turn 14 earlier and use more of the curb. With even more power there will probably need to be some partial throttle or coasting between turns 14 and 15.
Loose cars are likely to enter a drift between turns 14 and 15. This is obviously best tuned by making the car less tail-happy but if that is not possible, throttle reduction at turn 14 exit may be in order.
Turn 15-16
This is perhaps the trickiest corner of the whole circuit. Assuming the car was quick through turn 14 it approaches turn 10 at a lot of lateral G under throttle; it then needs to brake for turn 15 while still turning and nail the blind apex to set up ideally for turn 16.
The easiest strategy for turn 15 in my opinion is seat time - getting many laps through this section builds confidence in braking later as well as develops gauges for where the car needs to turn to hit the apex. It took me several hours of track time to get used to driving deep into turn 15, granted, this was on deteriorating tires. Learning this turn will surely be faster in a well-handling car.
Nailing the apex in turn 15 is a prerequisite for the best lap time, as being off the apex in turn 15 puts the car way out of position between turns 15 and 16, compromising either the line or speed through turn 17. As turn 15's apex is blind, hitting it perfectly requires extensive practice. Again track time is an easy way of getting there, though not necessarily the cheapest one or one that is readily available.
I believe all cars should touch the apex of turn 15 regardless of grip and power levels. Low power cars will then go to full throttle and carry the thottle throughout turn 17 onto the main straight, while tracking out a bit between turns 16 and 17 and entering turn 17 from perhaps 3/4 track right. Medium power cars will need to compromise the line between turns 16 and 17 to fit into turn 17, my guess being a late apex in turn 15 and a lift prior to turn 17 turn in will produce the best results. High power cars will likely need to try the different line possibilities with a lap timer to make an educated decision as to what is best.
Turn 17
This turn is about correct reference points, vision and comfort with exit curbs. As the apex is blind I concentrate on being in the right edge of the track about 3/4 of the way into the right curb, and turn in from there. If I am not able to get the car over to the right edge before turn in I know I need to adjust my line and my speed to fit into turn 17 exit. The exit curb in turn 17 is very usable and should be used by just about everything, though most DE drivers stay off of it entirely. The entire turn is taken under full throttle in a low power car with medium power cars likely lifting at turn in to rotate into the turn and high power cars likely brushing the brakes to additionally lose some speed.
Early throttle application coming out of turn 17 is obviously king. Turns 15 and 16 should be compromised as much as possible to obtain the earliest throttle application in turn 17.